Wednesday, May 17, 2017

Taylored Expressions Clearly Planned Sneak Peeks: Spoil Yourself

2:36 PM 0 Comments

Hello! It's Day 3 of Sneak Peeks from Taylored Expressions, and all of the new products will be available tomorrow, May 18th at 7AM PST!

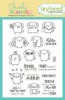
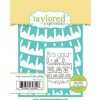
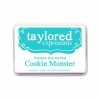
I made a fun little card today using the adorable new Wag More, Bark Less stamp set. These images are so stinkin' cute! I stamped the sweet dogs with Oreo Ink and colored with Copic Markers. I framed my images using the Peek-a-boo Circles Die and some Lollipop cs. I then layered that over a background that was cut with the Party Banner Cutting Plate out of Cookie Monster cs.


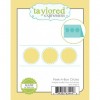
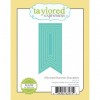
The sentiment banner was cut using a Stitched Banner Stacklets Die, and the clear stamps make it so easy to stamp the repeated sentiment:) Finally, I added some Peapod Enamel Shapes to finish it off. So fun!

Please check out the Taylored Expressions Blog for more info on the awesome Clearly Planned release! Thanks for stopping by!

Kerri


Thursday, May 4, 2017

Taylored Expressions Release Day: Sound the Alarm!

10:00 AM 0 Comments

Hello! It's Release Day at Taylored Expressions which means that all of the new products are now available in the TE Store!

I have a couple more projects to share with you today, and the first uses this super fun new On the Road-Firetruck Dies. I started by putting my firetruck together using Cherry Pop, Oreo, Earl Grey, and Sugar Cube cs along with some TE Vellum for the windows.

I decided to make the background look like a skyline of a city sitting by the water at sunset:) I cut a strip of Sprinkles cs for my water and then cut my city skyline using the Downtown Border Die along with the new Downtown Border Underlay Die and some Oreo and Lemon Meringue cs. I put my road together using Build a Scene On the Road Dies along with more Oreo and Lemon Meringue cs. The sky was brushed with Pumpkin Ink using my template cut with the Build a Scene Rolling Clouds Dies and a Clarity Stencil Brush. Finally, I stamped the sentiment from the new set Wee-ooh Wee-ooh using Oreo Ink and the Mini Misti Stamp Tool to align.


For my next project, I made a pair of tags using the Lucky Stars Stamp & Die Combo:


For my pink tag I stamped the stars with Salt Water Taffy, Plum Punch, and Strawberry Milkshake Ink and for the orange tag I stamped the stars with Candy Corn, Granny Smith, and Cookie Monster Ink. I cut them out with the included die. I used the Build a Tag 4 Dies and cut the bases with Strawberry Milkshake and Candy Corn cs. I then cut the next layer out of Sugar Cube cs and adhered my stars.


For my pink tag, I stamped the celebrate sentiment from the Lucky Stars Stamp & Die Combo with Oreo Ink onto some Salt Water Taffy cs and cut out with a Stitched Banner Stacklets Die.


For my orange tag I stamped the sentiment onto some Granny Smith cs. So fun!


Thanks for stopping by! If you'd like to see more projects and new product information, please head over to the TE Blog for a complete list of our participating designers! Happy Shopping!


Kerri

Follow Us @soratemplates